...
Followings are overall steps associated with VPC
STEP 1. Create a Elastic IP address for connection
https://ap-northeast-2.console.aws.amazon.com/ec2/v2/home?region=ap-northeast-2#Addresses:
- Allocate Elastic IP address and name it
STEP 2. Create VPC
1) AWS Management Console → Services from Top menu → type "vpc"
2) Launch VPC wizard: → select VPC (isolated service) → Create VPC
https://ap-northeast-2.console.aws.amazon.com/vpc/home?region=ap-northeast-2#
2) Set IPv4 CIDR block*: 10.0.0.0/16
3) check at No IPv6 CIDR Block
4) Set Tenancy = default
...
- Select VPC with Public and Private Subnets
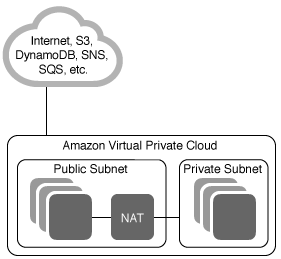
- Put proper name to VPC Name, Public subnet, Private subnet
- Assign Elastic IP designed at STEP 1
- Leave other values as default like IPv4 CIDR block, Hardware tenancy, and etc.
STEP 3. Create internet gateway
1) Create internet gateway: initial state will be "detached"
2) Attach to VPC
...
- Your gateway would be automatically created. Just name it.
STEP 4. Create "Public Subnet"
...
at Subnets
https://ap-northeast-2.console.aws.amazon.com/vpc/home?region=ap-northeast-2#subnets:sort=SubnetId
- Just check if your subnet is in the list. You have nothing should do
STEP 5
1) Select VPC: it will automatically set set VPC CIDRs
2) Set Availability Zone
3) Set IPv4 CIDR block*: 10.0.1.0/24
...
. Create "Private Subnet"
...
1) Select VPC: it will automatically set set VPC CIDRs
2) Set Availability Zone
3) Set IPv4 CIDR block*: 10.0.2.0/24
...
at Subnets
https://ap-northeast-2.console.aws.amazon.com/vpc/home?region=ap-northeast-2#subnets:sort=SubnetId
- Just check if your subnet is in the list. You have nothing should do
STEP 6. Set Public Route Tables
1) Usually automatically generated, and requires renaming like "Public RT" for you
2) Select your route table → move tap to "Routes" → add route → add "0.0.0.0/0" and set target to internet gateway defined at STEP 23
3) move tap to "Subnet Associations" → Edit subnet associations -> Select only "public subnets" -> Save
STEP
...
7. Set Private Route Tables
1) Create Private Route Table and name it like "Private RT" for you
2) move tap to "Subnet Associations" → Edit subnet associations → Select only "private subnets" defined at STEP 4 5 → Save
STEP
...
8. Create security group
1) One default inbound rule will be listed
2) Add one more a rule : set Type to "SSH" → set Protocol to "TCP" → set Port Range to 22 → set Source to "My IP" → Your IP will be automatically assigned or your can simply assign 0.0.0.0/0
STEP
...
9. Create network ACL
1) One default ACL will be listed, and just rename it in your own way
2) Set Inbound Rules
STEP
...
10. Creating instances
1) Launching Instances → Choose an AMI (Amazon Machine Image) → Free Tier only (if you are new)
2) Select Network by VPC designed at STEP 12
3) Select Subnet designed at STEP 3 and STEP 45
4) Enable "Auto Assign Public IP"
5) Configure Security Group based on you created at STEP 78
6) Download key Pair for secure connection → Launch Instances
...