...
- Select VPC with Public and Private Subnets
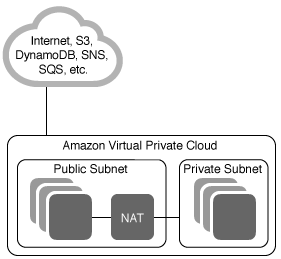
- Put proper name to VPC Name, Public subnet, Private subnet Set Availability Zone by AZ1 associated with Availability Zone1.
- Assign Elastic IP designed at STEP 1
- Leave other values as default like IPv4 CIDR block, Hardware tenancy, and etc.
...
| Name | IPv4 CIDR | Availability Zone |
|---|---|---|
| PublicSubnet-az1 | 10.0.0.0/24 | az1 |
| PrivateSubnet-app-az1 | 10.0.1.0/24 | az1 |
| PrivateSubnet-db-az1 | 10.0.2.0/24 | az1 |
| PublicSubnet-az2 | 10.0.3.0/24 | az3 |
| PrivateSubnet-app-az2 | 10.0.4.0/24 | az3 |
| PrivateSubnet-db-az2 | 10.0.5.0/24 | az3 |
STEP
...
5. Set
...
Route Tables
1) Usually automatically generated, and requires renaming like "Public RT" for you
2) Select your route table → move tap to "Routes" → add route → add "0.0.0.0/0" and set target to internet gateway defined at STEP 3
3) move tap to "Subnet Associations" → Edit subnet associations -> Select only "public subnets" -> Save
STEP 7. Set Private Route Tables
1) Create Private Route Table and name it like "Private RT" for you
...
Name Route Table ID by "Elplicit subnet association" and "Main" like below:
| Name | Explicit subnet association | Main |
|---|---|---|
| PublicRT | subnet-**** | No |
| PrivateRT | Yes |
STEP 8. Create security group
...
STEP 10. Creating instances
https://ap-northeast-2.console.aws.amazon.com/ec2/v2/home?region=ap-northeast-2#Instances:
1) Launching Instances → Choose an AMI (Amazon Machine Image) → Free Tier only (if you are new)
...